Today I'm taking part in and amazing blog hop with Maria Willis of Cardbomb to celebrate the launch of this month's Stamp Club, Patterns and Prints!
Tonic Studios are having a HUGE Birthday Week celebration with sales, competitions and giveaways. You can see the entire event below.
UK EVENT HERE
USA EVENT HERE
Welcome to Stamp Club Patterns and Prints!
Stamps: 15 total stamps in a mixed media style that is perfect for creating beautifully textured backgrounds and projects.
Dies: 14 total dies Includes bold word dies that be rearranged to create new sentiments. Use in combination with the bold word dies from Backgrounds & Borders to increase your sentiment options! Includes four sentiment dies in a fun cursive font that have both the text and shadow dies. Includes two large stand-alone dies that can be used to create backgrounds, accent pieces or used as stencils to add texture to your projects.
- Monthly Stamp release to be launched on the last Friday of every month (holidays permitting).
- Not a subscription based program.
- Patterns and Prints stamp and die set will only be sold as a bundle.
- Limited stock available.
- Retail value £39.99 / $39.99 so you receive a £/$5 savings.
- Exclusive to Tonic Studios.
- Inspired by Maria Willis.
- Tonic dies are amazing and come pre-cut/separated with no burs.
- Stamps and dies come in high quality plastic envelopes with a tab for labelling and binder holes on the side and are compatible with all Tonic Studios A5 binders.
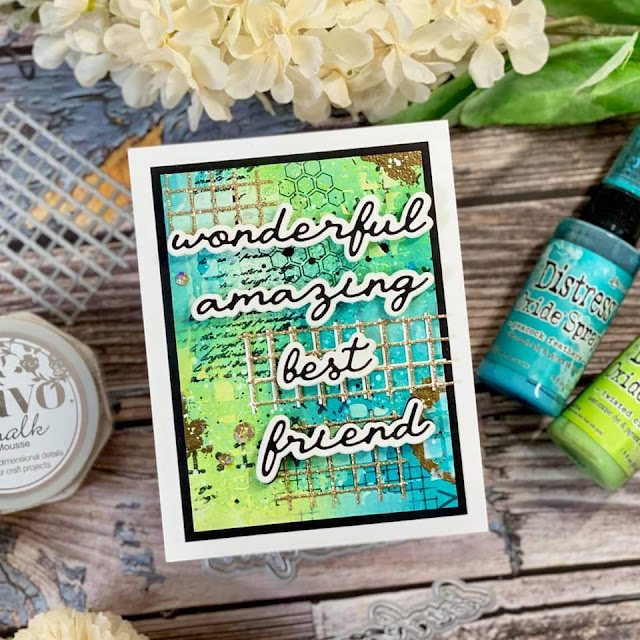
- Spray Peacock Feathers and Twisted Citron onto an A4 piece of watercolor card and allow to dry. You will get 4 panels from this but for now cut one panel 3" x 4 1/4".
- Stamp the cursive script, the grid and small hexagon onto your panel with black shadow ink.
Top Tip - Allow to completely dry before heat embossing or else you'll cover your whole card with embossing powder.
- Gold heat emboss some of the circle stains in the corners.
- Die cut the grid and any card and use as a stencil with White Chalk Mousse (it's amazing!)
- Add black and white acrylic ink splatter.
- Die cut the grid three times in white card and once in welsh gold glitter card. adhere together for a chipboard effect. Trim and apply onto your panel.
- Die cut wonderful, amazing, best, and friend in black and white, apply foam pads and stick to the front of your panel.
- Trim a piece of jet black card 3 1/4" x 4 1/2"
- Assemble onto an A2 card blank add champagne shine sequins.
- Trim a piece of your already sprayed panel to just fit the HELLO die panel.
- Stamp the cursive script, and the grid onto your panel with black shadow ink.
- Gold heat emboss some of the circle stains in the corners and zigzag.
- Use the same grid from card 1 to use as a stencil again with White Chalk Mousse.
- Die cut the grid twice in welsh gold and place behind a piece of black card.
- Mat and layer onto white and gold until you have an US A6 size card.
- Trim a watercolor panel 6 inches by 3.5 inches (this will be further trimmed)
- Stamp the cursive script, and the grid onto your panel with black shadow ink.
- Die cut 2 grids from any card and stencil the white chalk mousse onto your panel in several places.
- Smooth your Tumbled Glass Distress Oxide onto a non stick surface and spray with a little water. Press your panel into the ink/water mixture with a light patting motion until you are happy with the look.
- Add more distress oxide to a non stick surface and then mix a small amount of White Chalk Mousse into the color. This is freakin amazing as you have the chalk finish of the mousse and matte oxide finish - AWESOME! Because you're mixing the color from the ink pad and not a liquid, there is no change to the consistency of the mousse.
- Use the other grid to stencil the tumbled glass chalk mousse onto your panel (do not throw this away).
- Trim panel 5" x 2"
- Splatter white and gold acrylic ink over your panel and allow to completely dry.
- Die cut 2 welsh gold grids and 4 watercolor grids but save the small squares from the glitter card.
- Die cut the letters that spell out YOU ARE LIT 8 times. 6 regular white card, 1 harvest gold mirror card, 1 watercolor card. Layer up all 6 white letters and then add your watercolor letters on top. Create a drop shadow with the gold letter and set aside.
- Work out your die cut grid pattern and then use your grid from steps 6 and 8 to create your design. Add the glitter squares back in to some of the grid.
- Attach your letters to the front of your panel and allow to dry.
- Trim teal card 5 1/4" x 2 1/4"
- Assemble onto a slimline card base 6" x 3 1/2" and add champagne shine sequins.


these are both absolutely fabulous
ReplyDeleteSandi thank you so much!
DeleteLove these great background textures to add interest to my cards. Love your designs.
ReplyDeleteEve you're so sweet, thank you! I had a great time adding all the layers and textures to my cards this month.
DeleteGreat cards!
ReplyDeleteLove these cards there fabulous!!
ReplyDeleteGreat cards! Love the dies in this set!
ReplyDeleteGuess I am too old - when I am thinking You Are Lit is NOT something I would send a friend on a card... LOL. Enjoyed your cards.
ReplyDeleteHi Kathy and thank you so much for leaving me a comment. As I'm from Southern California I still say things like you're awesome or you're rad or you're lit - it is a term of endearment for me to my friends. I guess that's what makes this set so versatile, you can make things that are meaningful to you with all the letters available.
DeleteAbsolutely wonderful, Jen! The colors you have chosen put a huge smile on my face and I love all of that texture!
ReplyDeleteYour cards are beautiful. I love that you chose to go with a very non traditional sentiment on the one card.
ReplyDeleteJen. I love the slimline card. (Im jen too ) hehe
ReplyDeleteVery pretty combinations of colour, texture and words. I love the font of the script especially. PLEASE ask tonic to do more words in that font! You've used my favourite colour combos! Clever girl! 😘
ReplyDeleteI really like the look of all of your cards!
ReplyDeleteThanks for sharing.
Wow these are all so amazing..love them!!
ReplyDeleteMarisela Delgado said: Such beautiful cards! So pretty! mariandmonsterd@yahoo.com
ReplyDeleteLove your cards. They are just fabulous. Thanks.
ReplyDeleteBeautiful colors and textures! Great Stamp Club bundle!
ReplyDeleteOne of the best hops I have been on in a while. FULL of great cards with beautiful colors and textures. TFS
ReplyDeleteYour color choices are beautiful! Your cards are beautiful!
ReplyDeleteWow!! You are cards are beautiful!
ReplyDeleteHi Jen :) Your You Are Lit card is gorgeous!!! Lov'em all! Thanks for inspiring me :)
ReplyDeleteBeautiful cards
ReplyDeleteOh my I just love the colors of the "You are it". This pattern and prints kit is fabulous. I always admire the mixed media look and hope I can make something this pretty. I love that the grid can be do many techniques. Awesome awesome! The chalk mouse sounds b,eau.ti.ful!!
ReplyDelete