Hi everybody! I'm so excited to be taking part in this amazing blog hop with Maria Willis of Cardbomb, using her new Stamp Club release, Hey Snowmie! HOW ADORABLE IS THIS SET?

You can start shopping now, yay!
UK and rest of the world Shop Here --> www.tonic-studios.co.uk

USA Shop Here --> www.tonic-studios.com
Welcome to Stamp Club, Hey Snowmies!
This incredible bundle includes a collection of fun snowmen and winter scene stamps, a host of hilarious pun stamps plus all the accompanying dies you'll need for effortless fussy-cutting! In addition to the stamp and die set bundle, you'll also receive a free snowflake stencil!
Stamps: Set includes 20 stamps featuring playful snowmen, Christmas trees, snowflakes and stars – plus a wide selection of wintery sentiments!
Dies: Set contains 43 dies, including dies to build a card snowman, dies to decorate him, dies designed to perfectly fit your Hey Snowmie! Stamps and extra, additional dies to create your finishing touches.
What is Stamp Club?
- Monthly Stamp release to be launched on the last Friday of every month (holidays permitting).
- Not a subscription based program.
- Hey Snowmie! stamp and die set will only be sold as a bundle.
- Limited stock available.
- Retail value £39.99 / $39.99 so you receive a £/$5 savings.
- Exclusive to Tonic Studios.
- Inspired by Maria Willis.
- Tonic dies are amazing and come pre-cut/separated with no burs.
- Stamps and dies come in high quality plastic envelopes with a tab for labelling and binder holes on the side and are compatible with all Tonic Studios A5 binders.
- 6x8" stamp and die set contains 20 stamps and 43 dies.
- Comes with a FREE Hey Snowmie Stencil 4820E, worth £7.99!
Giveaway
One lucky winner will win a £50/$50 Giftcard to Tonic Studios and the Hey Snowmies! bundle!
To enter, comment on every blog in the hop by 11:59pm PST on November 3, 2021/ 7:59am GST on November 4, 2021. Winner will be announced on November 5, 2021 on IG and FB so make sure you're following all of the Tonic Studios social media accounts!
I've made two cards to share with you today but could have made a bunch more if I had the time.
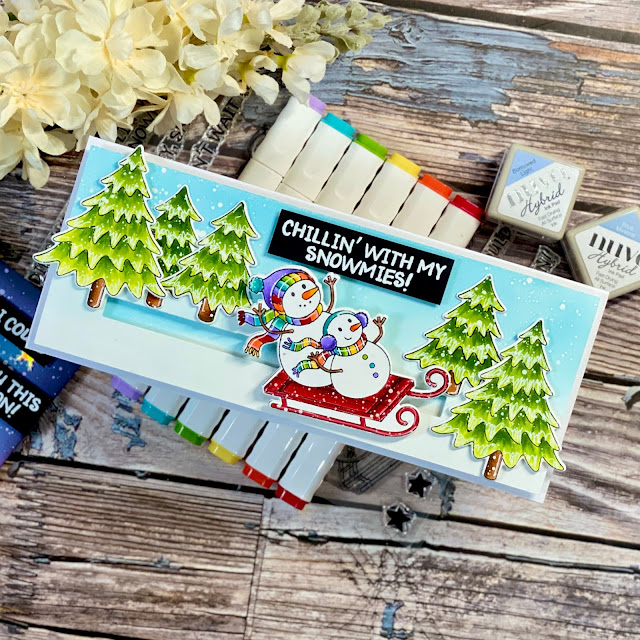
Card 1 Slimline Slider Card
This set screams fun and when I say fun I mean, "let's make an interactive card" kind of fun!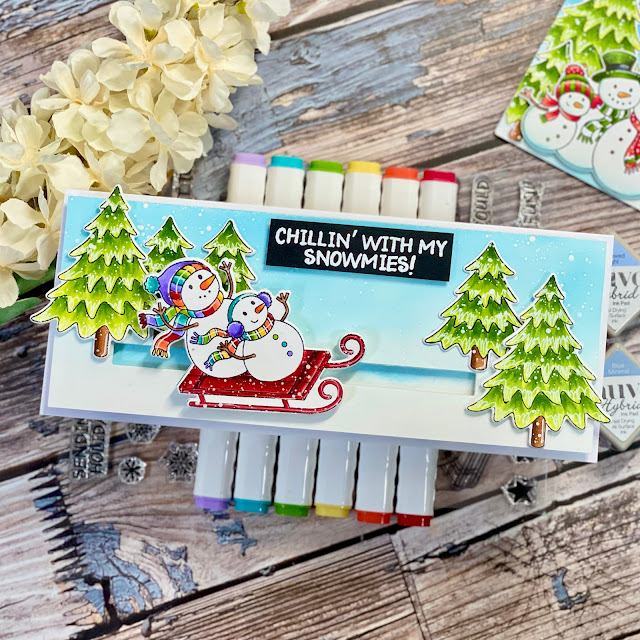
This set screams fun and when I say fun I mean, "let's make an interactive card" kind of fun!
- Start out with two smooth white (or watercolor card) panels measuring 8.25 inches by 3.25 inches. Set aside one of the panels to use later. With one of the panels, splatter masking fluid over it. This will ensure that your snow fall is perfectly white. I love using this technique on my cards.
- Once dry, use a light blue ink to create a soft background. I've used Nuvo Hybrid Inks Borrowed Light and Blue Mineral. Let the ink dry and then gently rub off the masking fluid to reveal your white snow.
- I looked through my dies stash and found a long'ish thin die that's perfect for a slider. I then cut it into my card panel twice as it wasn't quite long enough.
- You'll then need to add foam pads to the back of your panel. I've doubled up my foam adhesive to give a smoother slide.
- Grab your second panel and ink just the area where the slider mechanism will show.
- Add your penny with foam adhesive through the slider area and attach a die cut sleigh (just a plain die cut as you can add your colored image over the top).
- Color your image and trees with Nuvo Alcohol Markers, then die cut. Use a white gel pen to add highlights.
- Align your trees and add your colored sleigh to your panel.
- White heat emboss onto black card your sentiment, cut to size and then add between your trees.
- Mount your completed panel onto a Slimline card base.
How adorable is this card?! 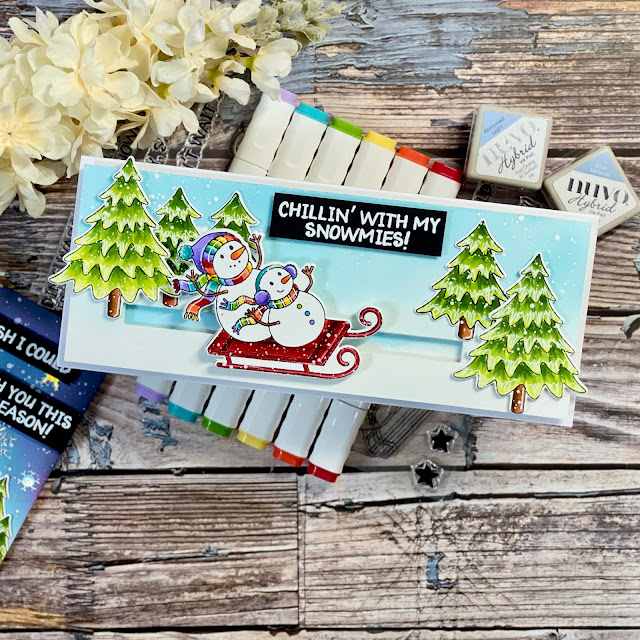
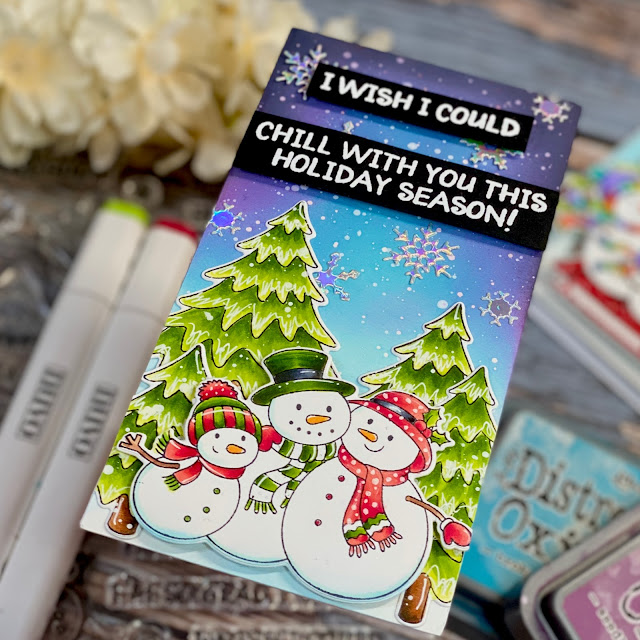
Card 2 Mini Slimline Card
This is an, "I miss my family during the holidays", kind of card.
This is an, "I miss my family during the holidays", kind of card.
- Trim a watercolor panel 3 inches by 6 inches. Splatter masking fluid over it and allow to dry completely.
- To create your background, use Distress Oxides, Tumbled Glass, and then Broken China. Next use Seedless Preserves around the top edges and finish off with a little Black Soot .
- Stamp and color four trees, and the snowmen trio. Add a white gel pen for highlights.
- Position your stamped images on your card (but not glue down). Cut out a ton of snowflake dies in Holo Waves and set aside.
- White heat emboss on black card your sentiment. Trim.
- Play with the position of your scene, the snowflakes, the trees and snowmen, as well as your sentiment.
- Adhere onto a mini-slimline card base, 6.25 inches by 6.25 inches.
This card is so sweet and with the world still in chaos, I miss my family so very much. My beautiful Niece is already 2 years old and I've not been able to visit, although we video chat regularly, it's just not the same. Living 6,000 miles from your family has it's trying moments but I continue to be grateful for all that I have.
Do you have a favorite card? I can't decide so choose both, haha!
The sentiments in this set are particularly awesome and I LOVE them In fact, I love everything about the set this month!
The sentiments in this set are particularly awesome and I LOVE them In fact, I love everything about the set this month!
As well as the stamp and die set, there is a mini-slimline envelope launching today! How cool is this?! One cut on your die cutting machine and you're envelop is ready to be folded and made up!
You can buy it here:
You can buy it here:
Mini Slimline Envelope Die Set
Buy here for Tonic Studios UK
Buy here for Tonic Studios UK
Buy here for Tonic Studios USA
Thanks for visiting today. Next on your hop is the super incredible Jessica Frost-Ballas
Come Hop With us!
Maria Willis
Sandi MacIver
Daniel West
Ilina Crouse
Ilda Diaz
Channin Pelletier
Jen Kray
Jessica Frost-Ballas
Mindy Eggen
Emily Midgett
Michelle Short
Marie Heiderscheit
Maria Willis
Sandi MacIver
Daniel West
Ilina Crouse
Ilda Diaz
Channin Pelletier
Jen Kray
Jessica Frost-Ballas
Mindy Eggen
Emily Midgett
Michelle Short
Marie Heiderscheit
Shopping Basket (Some of the links I use are affiliated. This means I make a small commission when you purchase through them. There is no additional cost to you but means the world to me. I am so grateful for your support, thank you.)
great cards Jen
ReplyDeleteLove all your cards and of course the touches of rainbow! That slider one has my heart!!!
ReplyDeleteGreat card!!
ReplyDeleteI love your interactive card, and how they ZIP across the snow. CUTE
ReplyDeleteYour coloring is AWESOME! I love these!
ReplyDeleteDarling little sledding snowmen!
ReplyDeleteHi, Jen - I love these cards!! The coloring is off-the-charts good! Keep 'em coming!! Thx for sharing!
ReplyDeleteLori S in PA
Omg!! I totally love both the cards! Just cannot choose 😍😍😍😍 super super cute
ReplyDeleteGorgeous cards! The trees look so realistic with the different shades of green. You color so well! I love your card so very much! You are extremely talented! This is one of the best stamp sets I have ever seen and I am super excited to be given this chance to win! Thank you so much!
ReplyDeleteMarisela Delgado said: Those snow people look so happy! Beautiful cards! mariandmonsterd@yahoo.com
ReplyDeleteAbsolutely brilliant pair of cards Jen! You can tell you've had so much fun making them and you're right to choose both as favourites!😍😜
ReplyDeleteI hope that when you are able to take time away from home home, that you get to visit your family again very soon, now that restrictions between the UK and US have finally opened up🤞💗
Fun cards!!
ReplyDeleteSuch sweet cards! Love them both.
ReplyDeleteI love your fun and festive cards! Great coloring!
ReplyDeleteFantastic job on shading the
ReplyDeletetrees. Wonderful cards.
thanks for sharing
txmlhl(at)yahoo(dot)com
Both cards are so adorable! Love the slider card with the snowmen.
ReplyDeleteThanks for sharing.
Marisela Delgado said: I love this stamp set! So cute! mariandmonsterd@yahoo.com
ReplyDeleteGorgeous cards Jen! Your little snowmen are certainly having a wonderful time!! Great colouring!Thanks for the great inspiration! Stay safe! :)
ReplyDeleteVery cute cards. Love this stamp set and so many things you can do with it.... Thank you for sharing.
ReplyDeleteSo adorable! Love interactive cards!
ReplyDeleteJust love how your sledding snowmies look like they are flying through the snow!!! Super cute!!!
ReplyDeleteJen, these cards are darling. I am always a fan of rainbow coloring and I love the dots you added to Mrs. Snowmie's hat. Fabulous coloring.
ReplyDelete