Hello everybody, and welcome to my papercrafting blog. Every month I'll be sharing inspiration for different Club Kits from Spellbinders, and I can't wait to show you what I've been up to recently.
**Thank you for using my affiliate links to shop, your support means so much to me, and I shall endeavour to share as many inspirational posts as possible.**
The March club, 'Have a Spring Day', subscription window is now open. Sign up Feb 1-24th and receive the pictured kit.
Join the Card Kit of the Month Club and receive an expertly curated cardmaking kit each month, complete with inspiration. Plus, members get store savings, extra deals, gifts, and more. Click Here to learn more about club membership.
There are now UK Deliveries from $3.00 for all the monthly kits! This month's "Have a Spring Day" Card Kit includes a 6x6 paper pad, clear stamps, an adorable die set, tons of embellishments, and more!
Check out our NEW MONTHLY CARD KIT EXTRAS if you want just purchase select items from the kit or need more embellishments. You can shop the store or add to your cart at the club checkout. Shop Now
Membership Includes:
- A Monthly Card Kit Containing: Dies, Clear Stamp Set, Die Cut Shapes, Paper, Envelopes & Embellishments. Contains at least 200+ pieces and will create 10+ complete cards. $60 Value!
- Project Inspiration: Each kit will feature project ideas with at least one detailed how-to instruction tutorial each month.
- Member Benefits & Savings: Receive exclusive member pricing in the Spellbinders store. Plus receive access to deals, savings, and gifts - only available to members.
Click here --> ALL ABOUT SPELLBINDERS CLUBS HERE
Interested in becoming a member of multiple clubs?
**Die & Card Kits Include wafer thin dies that can be used on most industry standard manual die cutting machines.
The Projects!
Although I made 6 cards so far with this kit, I've only shared three. This is because I took my kit to the hospital with me and made them whilst I was there, and gave three away to the lovely staff. I have Aplastic Anemia, so I'm always in and out of the hospital, but I refuse to let it rule my life and I won't be held back by my illness.
One thing I realized is how AWESOME these kits are, and that you can take them just about anywhere and craft. So perfect when travelling, on vacation, visiting friends, and even using with your small people - kids and grandkids!
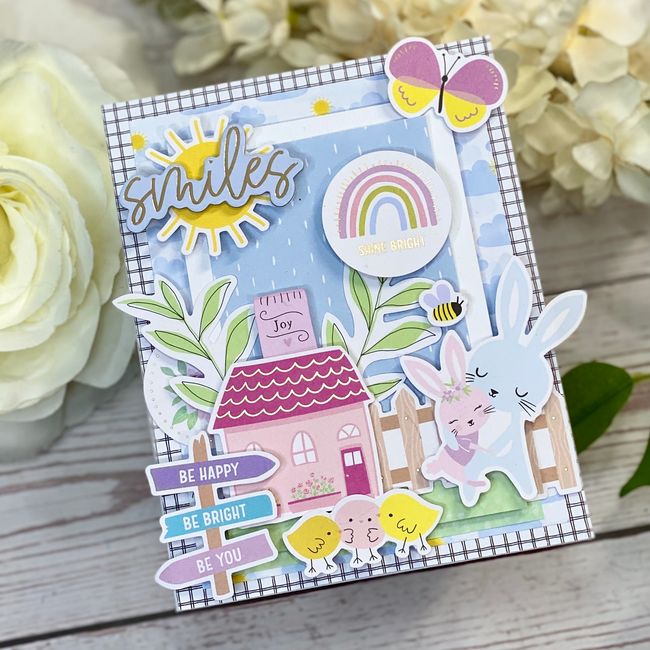
Project 1 Smiles


- Trim a piece of Patterned paper, grid, A2 size (5.5 x 4.25 inches) and glue to your card blank.
- Next, trim additional layers, cloud 5" x 3.75", white card, 4.75" x 3.5", rain, 4.5" x 3.25". Select matching die cuts, chipboard and sentiments.
I usually lay everything out until I'm happy with the design, before gluing anything down.
- Mount your panels, with the top one adhered with foam pads.
- Isn't this card the cutest!
- Trim two pieces of out the paper pad, one 5.5 x 4.25 inches and the other 5 x 3.75 inches. Mat and layer onto an A2 card blank. Also trim a small piece of grid and set aside to use under some of the elements.
- Mat and Layer the above, using foam pads.
- Begin by adding a small piece of grid card underneath the heart design. once you have the hearts positioned, you can trim and adhere the grid panel.
You now have another gorgeous collage card using your kit contents.
- Trim thee designs from your paper pad, adhering the chevron style to an A2 card blank.
- Next use the grid design, but cut it in two different panels, as shown.
- Use the frame in the kits, and add a piece of patterned paper inside it, then pop up on foam pads (3mm) and adhere all the panels and frame to your card base.
- Start adding some fun elements from the kit, like those gorgeous bunny and lamb faces, and that rainbow!
- Next, add the chipboard sentiments, grateful, for you, and then the smaller one at the bottom of the design, do small things with great love.
Thank you so much for taking the time to visit me today. I had a great time with this Kit and I'll be back tomorrow with another post!
Sending crafty hugs and love,
Jen
Shopping Basket (Some of the links I use are affiliated. This means I make a small commission when you purchase through them but don't worry, there is no additional cost to you. Your support means the world to me, and I am so grateful that you choose to shop through me. From the bottom of my heart, thank you.)


Comments
Post a Comment
Thank you for taking the time to read my blog today. I am thankful for the people in my life and although the world seems upside down at the moment, the joy of craft brings us all together.